Quantcast
Channel: Prestashop – Prestashop Development
Viewing all 83 articles
Browse latest View live

Installing Prestashop Locally with Bitnami

$
0
0

If you have not heard Bitnami released a version of Prestashop with their auto installer application. What does that mean for you? A dead simple way of installing and running Prestashop on your local machine.


How do you install Prestashop?

First you will need to go to Bitnami and download the application. Once you download it, click to install the application. Bitnami Prestashop


Installation Folder

Now that you have started the installer, just navigate your way through the prompts. Most of the default selections should work just fine for installing Prestashop. When installing Prestashop, you will come to this screen. If you want you can change it, but remember what location you set the installation folder to. This will be the base of the Prestashop installation in case you need to edit any template files or make any overrides.

Prestashop bitnami template location


Login Information

After you set the directory, you will have to enter the login information for the shop, don’t forget it, you will need it later to log into the back office.

Prestashop Bitnami Login


Web server port, ssl port, and mysql port

Next it will ask you what port number you want apache to use. 80 is the normal http port, but sometimes you might have applications running that will not let you use port 80. If you get an error message saying “the port is already bound” you should try closing skype and Xampp if they are open. If they are not and you still get the error, you will have to use another port. This will affect your shop url on your local system, so remember which port you used. Next are the shops ssl  and mysql port numbers. You should try to use the default values with these ports. If not, Bitnami will configure your shop to use what you enter.

Prestashop Bitnami Port Number


Host Name and email

Next is choosing the host name. If you are using a router it will grab your internal ip address in your home network. If you do not want your installation accessible from the internet or from other computers in your network, just leave the settings as they are. If you are wanting your shop to be accessed from the internet, use your ip address. You can get ip by Googling “what is my ip address”.

Prestashop bitnami hostname


Next is setting up mail support. Since you are testing Prestashop out locally, this isn’t a big deal. If you want to configure the mail support, just follow through the prompts and Bitnami will set up mail support for you.


Bitnami Could Hosting?

After you have made your way thought that, you will see the screen below. Uncheck the box, Bitnami is trying to sell you cloud hosting through their affiliated server. These severs have not been optimized for Prestashop hosting like A2 and Inmotion have. If you are looking for hosting for your shop, they are your best choice.

Prestashop Hosting

Now that you have finished your install, you can test out Prestashop!


Success!

You should be able to access your shop at what ever IP address you entered in the host name section. IMPORTANT, if you entered a different port for the webserver, you will have to append it with a : to your host name address. I have a web server running on port 80 so I had to use port 81. That means my address is 192.168.2.1:81 Once you access the hostname address, you should see this page.

Prestashop bitnami success


Accessing Prestashop files

The success message has links to everything you will need. There is a link to your phpMyAdmin installation and to your admin panel for your shop.  Also, if you need to edit any template files or any files associated with Prestashop, they should be available at C:\BitNami\prestashop-1.5.4.1-0\apps\prestashop\htdocs  unless you changed the location, then it will be at the custom location that you used.

Bitnami Prestashop Directory


Now you have installed Prestashop, if you have any question come to the Prestashop forum and ask. Prestashop has a very active community of members and a very active forum.


Happy selling.


by  is an expert in Prestashop and SEO related to e-commerce sites. He is the owner of Nashville based Designhaus42, a leader in Prestashop development with clients all over the world. In his free time he is a global moderator on the Prestashop forums and is very active in the SEO moz forums.


Search Pages as Landing Pages

$
0
0

What is this madness? How can you use an internal search page as a landing page, Google will never pick that up.  Actually Google will if you do them correctly, but it is all about how you do it.


SEO Search Pages

We have created a module that does exactly this, it turns your search pages into landing pages.  Landing pages that will get indexed and show up in the SERP’s. How do I know? Let me show you one.

SEO Results Prestashop

That page was generated by this module. You can go to it and test it out, maisondestencils.com/christmas  it really is a page created by this module.


Accessing the module

You can access the module like normal by going to the module configuration, OR you can access it from the drop down menu in Prestashop directly.

SEO Module


How does the module work?

It is very simple to use, you just install it and go to the configuration page, and add a term, a page title, a meta description and meta keywords. Below is a screen shot of the module configuration page.

SEO Prestashop Keywords


Once you are in the module, click “Add a new search term” and you are presented with this page. This is where you add your information for the search terms.

Prestashop SEO


Once you enter your terms, regenerate your sitemap and the new links will be included in the new sitemap. Regenerate them through this module, any other module will erase your pages out of the sitemap.


The best use of the module is to go to your stats page in Prestashop and see what users are searching for in your site. That way you can make targeted landing search pages for the search engines. If you are not familiar with how the search word stats work, you can see them in the back office under Stats.

Once you have a list of say your 10 most popular words, I would take those words to the module and make a landing page for each of them. That way you can increase the number of pages in the search engines, while at the same time not providing spammy results. Do not use this module to spam the search engines with hundreds of terms, you will likely draw a penalty from the search engines. 


Once you have created new pages, you can go to Google webmaster tools or Bing webmaster tools and submit the new pages that you have created. That is all you need to do, in a couple of days your new pages should be added to the search engines indexes and they can start showing up in the SERP’s.

Download SEO Search Engine Landing Pages Module

Extend the module on GitHub


by  is an expert in Prestashop and SEO related to e-commerce sites. He is the owner of Nashville based Designhaus42, a leader in Prestashop development with clients all over the world. In his free time he is a global moderator on the Prestashop forums and is very active in the SEO moz forums.

Prestashop manually backup your database

$
0
0

Have you ever wanted to know how to manually back up your Prestashop store? This can be really useful if you are going to upgrade your site, load a new csv file, or just to have in case anything happens to your server. Backing everything up manually is a great idea, most developers do it. Below I will show you how.


Backing up the database

The first step is to back up the database. For this you are going to need to login to the cpanel for your site. Normally they are located at either cpanel.yourdomain.com or domain.com/cpanel. When you access it you will see this screen.

Cpanel Login


From that screen you can login to your cpanel. Usually your cpanel login is the same as your ftp login, but that is not always the case. If you are unsure of your login refer to the email your host set up when you created your account or email them and ask them for the login information. Once you are logged in, you want to scroll to the bottom and look for the phpMyAdmin icon. It is under the headings databases.

cpanel phpmyadmin prestashop


Click on that icon and your database management will open up and look like the image below. Click on the database that you want to backup from the left column.

prestashop phpMyAdmin


When you click on your database it will open up in a view that shows all of the tables in your database. From that view click on export in the top menu, like the image below.

Prestashop Database Export


Once you click on export the next screen will ask you if you want to do a quick export or a custom export. Due to the size limitations of hosts and that Prestashop 1.5 databases can get large, select custom and press ok.

Prestashop Database Custom


The only thing you really need to select during the custom export is the compression. I recommend using gzip as the compression format, as it is universally supported.

Prestashop Database Compression


Now press Ok at the bottom of the screen and your database will start to download.

Database Export


Now you have a complete backup of your Prestashop database. So if anything happens to your site, you will be able to reload the database and restore it from when you last downloaded it.


by  is an expert in Prestashop and SEO related to e-commerce sites. He is the owner of Nashville based Designhaus42, a leader in Prestashop development with clients all over the world. In his free time he is a global moderator on the Prestashop forums and is very active in the SEO moz forums.

Manually back up your Prestashop files

$
0
0

What happens to your site if your server crashes? You could lose all of your and it might take months to rebuild your store again. Never fear, I will show you how you can back up your files manually in case anything happens. I would also suggest using this in conjunction with our article on manually backing up your database.


Downloading your site

First things first, you are going to need the ftp information to log into your site. When you signed up for your web hosting you should have received an email with all of this information in it. You are also going to need an ftp program, I recommend Filezilla, it is the most popular these days. Once you have it installed, open it up, it should look like this.

Filezilla Prestashop


As you can see in the image above I have highlighted where you will enter your server information. Once you have it entered you can click quick connect. Normally you will not have to enter anything for the port number, you can leave that blank.


Once you are logged in, depending on how your host is set up, it should look like the image below. All you have to do to back up your site is to right click on the public_html directory in the left pane and select download. If your site is very large this could take several hours.

Prestashop Filezilla


The only time that your files will ever need to be backed up again is if you

  • Add new products to your site
  • Install or remove any modules
  • Install another template
  • Edit your existing template
  • Upgrade your shop
  • Or if you make any changes to core files

People placing orders or contacting your customer service will not affect the files on your site, all of that information is installed in the database. So if you never do any of the above mentioned things you will only have to back your site up once, which is awesome.


by  is an expert in Prestashop and SEO related to e-commerce sites. He is the owner of Nashville based Designhaus42, a leader in Prestashop development with clients all over the world. In his free time he is a global moderator on the Prestashop forums and is very active in the SEO moz forums.

Website backup made easy

$
0
0

Normally my posts are centered toward Prestashop, but this is good advice for every platform. Most web hosts claim to do daily backups of your site, but what they don’t tell you is the daily backups are on the same hard drive that your site is on. What does that mean? That means if your hosts hard drive fails, your site, your customer information, everything, is gone.


How do you back your site up?

For the last several months I have been using a service called Code Guard. It automatically backs up your whole website and database to the Amazon cloud every day. What is even better is if you mess something up on your site, you can press one button and restore your site to the way it was the previous day. Below is a screenshot of the control panel.

Codeguard Backup


You can go several months back in time actually and restore you site to how it was months before. That is pretty Awesome.


The best feature

The best feature is it produces daily change alerts. These alerts let you know which files on your server have been changed. This is great for letting you know if your site has been hacked.


If you have sleepless nights wondering if your your site safe, you should check Code Guard out, for only $5 a month, it is worth it for the piece of mind.


by  is an expert in Prestashop and SEO related to e-commerce sites. He is the owner of Nashville based Designhaus42, a leader in Prestashop development with clients all over the world. In his free time he is a global moderator on the Prestashop forums and is very active in the SEO moz forums.

The fastest Prestashop possible

$
0
0

Optimizing Prestashop is something I spend a lot of time on, in fact it is something that I specialize in. Everyone has their own opinions of what you can do to make your Prestashop store the fastest. I have spent weeks testing different set ups and I can tell you without a doubt what you can do to make your Prestashop store the fastest it can be.


Get a VPS account

This is the foundation of a fast site. Shared hosting will not let you do the things described in this article, so you need to have a good VPS account. I always suggest WebHostingBuzz for hosting, they have fast servers and provide excellent support. A couple notes to hosting that I would like to mention. I do not recommend using hosts that are “cloud hosts” or instance based hosting. The reason being Prestashop requires processing power and memory. These type of hosts seem to allocate memory, but not processing power. I always recommend people to select a host that is transparent with how much processing power you have allocated to your account. Terms like 8x or 16x processing power mean absolutely nothing to me. What are they 8x or 16x of? I prefer knowing what resources I actually have at my disposal. With WebHostingBuzz I know that I am actually getting processor cores with a VPS account and I know what the processors are.


Another suggestion is to stay away from using SSD drives for doing these things I am going to mention, they are a waste of money and will actually slow some of the more important database queries down. You will have better performance at a host that has their drives set up in a raid 10 configuration. Trust me on this one, I will explain it more in depth later.


The base server setup

For your base server setup I recommend using Apache 2.2, PHP 5.4, and running PHP in Fastcgi. In WHM you should be able to build this set up with EasyApache. I also recommend installing mod_pagespeed as well.


Once you have these installed on your server, you will need to install Pecl so your WHM can access the Pecl extension library. The main extension that you want to install with Pecl is APC.


Zend optimizer has replaced APC in PHP 5.5 and also APC does not work in PHP 5.5. Don’t worry though, that is why we installed PHP 5.4, from my tests with Prestashop APC is a far superior Opcache than Zend or as it is called in PHP 5.5 opcache is.


What an Opcode cache does is pretty simple. When a user access your site, the PHP files are retrieved from disk, then compiled to Opcode, and then executed. An Opcode cache keeps the files compiled in memory and just waits to execute them . So you have essentially cut out a disk read, one reason that an SSD drive is not needed. In most cases SSD drives are faster reading from disk, but if you are not using disk, then you do not need them.


Here are the settings that I use for APC. These settings are for a small store with not a lot of products. These are good settings for you to start out with, you might need to increase them if your cache is filling up and things are getting pushed out too quickly.

apc.max_file_size = 2m
apc.ttl = 7200
apc.gc_ttl = 3600
; means we are always atomically editing the files
apc.file_update_protection = 0
apc.enabled = 1
apc.enable_cli = 0
apc.cache_by_default = 1
apc.include_once_override=0
apc.localcache=1
apc.localcache.size=128m
apc.num_files_hint = 1000
apc.report_autofilter=0
apc.rfc1867=0
apc.slam_defense = 0
apc.stat=0
apc.stat_ctime=0
;apc.ttl=7200
apc.user_entries_hint = 4096
apc.user_ttl = 7200
apc.write_lock=1

The most notable values that I am using is that the cache size is 128mb. If you have a larger site you might have to increase this value. I would start moving it up in 128mb increments until your cache stabilizes. Also I have turned the slam defense off as well, it can cause errors being written to your Apache error log. Once you have APC installed, install the apc.php file so you can see how well your site is utilizing the cache.

Once APC is installed and working, you can check your apc.php file to see how your cache is doing, it looks like the image below.

Fastest Prestashop APC


Optimize some files

Mod_pagespeed is an Apache module made by Google to automatically apply some of the Google Page Speed suggestions to your site. Once it is configured it automates the the process of several things that will make your site load faster. Below is a sample configuration that I use for mod_pagespeed.

LoadModule pagespeed_module modules/mod_pagespeed.so
<IfModule pagespeed_module>
Alias /home/bijou/public_html /usr/local/apache/htdocs
    ModPagespeed on
ModPagespeedFetchWithGzip on
SetOutputFilter DEFLATE

   	 AddOutputFilterByType MOD_PAGESPEED_OUTPUT_FILTER text/html
	 AddOutputFilterByType DEFLATE text/plain
        AddOutputFilterByType DEFLATE text/html
        AddOutputFilterByType DEFLATE text/xml
        AddOutputFilterByType DEFLATE text/css
        AddOutputFilterByType DEFLATE application/xml
        AddOutputFilterByType DEFLATE application/xhtml+xml
        AddOutputFilterByType DEFLATE application/rss+xml
        AddOutputFilterByType DEFLATE application/javascript
        AddOutputFilterByType DEFLATE application/x-javascript
        DeflateCompressionLevel 9
        BrowserMatch ^Mozilla/4 gzip-only-text/html
        BrowserMatch ^Mozilla/4\.0[678] no-gzip
        BrowserMatch \bMSIE !no-gzip !gzip-only-text/html
        DeflateFilterNote Input instream
        DeflateFilterNote Output outstream
        DeflateFilterNote Ratio ratio
ModPagespeedFileCachePath            "/var/mod_pagespeed/cache/"
ModPagespeedGeneratedFilePrefix      "/var/mod_pagespeed/files/"

ModPagespeedForbidFilters convert_meta_tags

ModPagespeedFileCacheSizeKb          102400
ModPagespeedFileCacheCleanIntervalMs 3600000
ModPagespeedLRUCacheKbPerProcess     1024
ModPagespeedLRUCacheByteLimit        16384
ModPagespeedCssInlineMaxBytes        2048
ModPagespeedImageInlineMaxBytes      2048
ModPagespeedCssImageInlineMaxBytes   2048
ModPagespeedJsInlineMaxBytes         2048
ModPagespeedCssOutlineMinBytes       3000
ModPagespeedJsOutlineMinBytes        3000

ModPagespeedEnableFilters extend_cache,combine_css,move_css_to_head,rewrite_javascript,rewrite_images,add_head,rewrite_css,collapse_whitespace,remove_comments,remove_quotes,sprite_images
ModPagespeedEnableFilters defer_javascript
ModPagespeedEnableFilters canonicalize_javascript_libraries
ModPagespeedEnableFilters recompress_jpeg
ModPagespeedEnableFilters recompress_png
ModPagespeedEnableFilters strip_image_meta_data
ModPagespeedEnableFilters insert_image_dimensions
ModPagespeedRespectVary on
ModPagespeedEnableFilters inline_images
    <Location /mod_pagespeed_beacon>
          SetHandler mod_pagespeed_beacon
    </Location>

    <Location /mod_pagespeed_statistics>
        Order allow,deny
        Allow from localhost
        Allow from 127.0.0.1
        SetHandler mod_pagespeed_statistics
    </Location>

    ModPagespeedMessageBufferSize 100000
    <Location /mod_pagespeed_message>
        Allow from localhost
        Allow from 127.0.0.1
        SetHandler mod_pagespeed_message
    </Location>
    <Location /mod_pagespeed_referer_statistics>
        Allow from localhost
        Allow from 127.0.0.1
        SetHandler mod_pagespeed_referer_statistics
    </Location>
</IfModule>

This configuration does several things here is a short list of what it will do.

  • Takes the white space out of the html resulting in smaller files
  • Removes the comments from the html, resulting in smaller file size
  • Removes the quotes on html elements resulting in smaller file sizes
  • Combines and compresses your css files resulting in fewer http requests and smaller files sizes
  • Moves your Javascript to the footer of the page and compresses it, resulting in smaller file sizes and quicker site loading
  • Compresses your images which results in smaller file sizes
  • If possible it will load Javascript libraries from Googles cdn, which makes your site faster with parallel downloads and also the file could already be cached on the users machine

It does a few more things but those are the main things which it accomplishes.

One note, if you install mod_pagespeed and get an entity ref error, the reason is more than likely that you have the convert_meta_tags filter on. Turn it off, it does not play nice with the Javascript that Prestashop uses in the head of the site. If that does not fix things set the pass through level to on and start enabling filters one by one.


Lets load files faster

What is the quickest way to load files? From memory! If you load files from memory you will get screaming fast performance. The easiest way I have found to load static files is by setting up a reverse proxy on the site. There is actually a WHM module that works really well for setting up a Varnish / Nginx reverse proxy for hosting your static files. It is called Apache Booster. You should install this in your WHM panel. Once you get it installed, this is what I recommend using for your Varnish configuration file.


include "/usr/local/varnish/etc/varnish/cpanel.backend.vcl";
include "/usr/local/varnish/etc/varnish/vhost.vcl";

sub vcl_recv {
set req.backend = default;
include "/usr/local/varnish/etc/varnish/acl.vcl";
include "/usr/local/varnish/etc/varnish/vhost.exclude.vcl";
set req.grace = 5m;

   # Handle IPv6
   if (req.http.Host ~ "^ipv6.*") {
        set req.http.host = regsub(req.http.host, "^ipv6\.(.*)","www\.\1");
   }

    # Sanitise X-Forwarded-For...
    remove req.http.X-Forwarded-For;
    set req.http.X-Forwarded-For = client.ip;
     include "/usr/local/varnish/etc/varnish/cpanel.url.vcl"; 
    # Remove has_js and Google Analytics cookies.
    set req.http.Cookie = regsuball(req.http.Cookie, "(^|;\s*)(__[a-z]+|has_js)=[^;]*", "");

    # Normalize the Accept-Encoding header
    if (req.http.Accept-Encoding) {
        if (req.url ~ "\.(jpg|jpeg|png|gif|gz|tgz|bz2|tbz|mp3|ogg|swf|flv|pdf|ico)$") {
            # No point in compressing these
            remove req.http.Accept-Encoding;
        } elsif (req.http.Accept-Encoding ~ "gzip") {
            set req.http.Accept-Encoding = "gzip";
        } elsif (req.http.Accept-Encoding ~ "deflate") {
            set req.http.Accept-Encoding = "deflate";
        } else {
            # unknown algorithm
            remove req.http.Accept-Encoding;
        }
    }

include "/usr/local/varnish/etc/varnish/url.exclude.vcl"; 
    # Ignore empty cookies
    if (req.http.Cookie ~ "^\s*$") {
        remove req.http.Cookie;
    }

          if (req.request == "PURGE") {
        if (!client.ip ~ acl127_0_0_1) {error 405 "Not permitted";}
        return (lookup);
}

    if (req.request != "GET" &&
       req.request != "HEAD" &&
       req.request != "POST" &&
       req.request != "PUT" &&
       req.request != "PURGE" &&
       req.request != "DELETE" ) {
    return (pipe);    
}

    if (req.request != "GET" && req.request != "HEAD") {
        /* We only deal with GET and HEAD by default, the rest get passed direct to backend */
        return (pass);
    }

if (req.http.Cookie ~ "^\s*$") {
        unset req.http.Cookie;
}

    if (req.http.Authorization || req.http.Cookie) {
        return (pass);
    }

set req.url = regsub(req.url, "\.js\?.*", ".js");
set req.url = regsub(req.url, "\.css\?.*", ".css");
set req.url = regsub(req.url, "\.jpg\?.*", ".jpg");
set req.url = regsub(req.url, "\.gif\?.*", ".gif");
set req.url = regsub(req.url, "\.swf\?.*", ".swf");
set req.url = regsub(req.url, "\.xml\?.*", ".xml");

# Cache things with these extensions
if (req.url ~ "\.(js|css|jpg|jpeg|png|gif|gz|tgz|bz2|tbz|mp3|ogg|swf|pdf)$" && ! (req.url ~ "\.(php)") ) {
    unset req.http.Cookie;
    return (lookup);
}

return (lookup);
}

sub vcl_fetch {

set beresp.ttl = 45s;
set beresp.http.Server = " - ApacheBooster";
set beresp.http.cache-control = "max-age=90000";
set beresp.do_gzip = true;
set beresp.do_gunzip = false;
set beresp.do_stream = false;
set beresp.do_esi = false;

set beresp.grace = 5m;

unset beresp.http.expires;
if (req.url ~ "\.(js|css|jpg|jpeg|png|gif|gz|tgz|bz2|tbz|mp3|ogg|swf|pdf|ico)$" && ! (req.url ~ "\.(php)") ) {
        unset beresp.http.set-cookie;
       include  "/usr/local/varnish/etc/varnish/static_file.vcl";
}
else {
         include  "/usr/local/varnish/etc/varnish/dynamic_file.vcl";
}

if (beresp.status == 503 || beresp.status == 500) {
        set beresp.http.X-Cacheable = "NO: beresp.status";
        set beresp.http.X-Cacheable-status = beresp.status;
        return (hit_for_pass);
}

if (beresp.status == 404) {
        set beresp.http.magicmarker = "1";
        set beresp.http.X-Cacheable = "YES";
        set beresp.ttl = 20s;
        return (deliver);
}

set beresp.http.magicmarker = "1";
set beresp.http.X-Cacheable = "YES";

}
sub vcl_deliver {

if ( obj.hits == 0 ) {
  set req.http.X-Stats-HitMiss = "miss";
 } else {
  set req.http.X-Stats-HitMiss = "hit";
 }

}
# what files to cache
sub vcl_recv {
   if (req.url ~ "\.(png|gif|jpg|ico|txt|swf|css|js)$") {
      return(lookup);
   }
}

# strip the cookie before the image is inserted into cache
sub vcl_fetch {
   if (req.url ~ "\.(png|gif|jpg|swf|css|js)$") {
      unset beresp.http.set-cookie;
    unset req.http.Cookie;
 remove req.http.Cookie;
   }
}

# add response header to see if document was cached
sub vcl_deliver {
   if (obj.hits > 0) {
      set resp.http.X-Cache = "HIT";
   } else {
      set resp.http.X-Cache = "MISS";
   }
}

One thing to notice, the max age on the static files is set to 90000 seconds. If you update any of the static files on the shop such as change a css file or regenerate your images, you will have to invalidate your cache.

To test if Varnish is installed correctly you can go to isvarnishworking.com and enter your websites address. When you enter a page it should look like this.

Varnish Prestashop


What this means is that Varnish is not caching your page files. You do not want Varnish to cache them, the way that Prestashop and other e-commerce programs work it will cause problems if the pages are cached. What you are wanting is for the static files to be cached. Try entering one of your image file addresses in the box on isvarnishworking.com and it should look like the image below.

Prestashop varnish Working

Some notes about memory usage and other limits

For a site with moderate traffic I would recommend about 2gb of dedicated memory. I usually set the memory at 512mb for php, 128mb for APC, 256 mb for Varnish, and 128mb for the query cache in MySql. The rest of the memory should be left for Apache services and for mail. The limits that you use will totally depend on how large your site is. If your Varnish cache fills up quickly, you should increase it as much as  you can to keep files cached. If you have lots of products and modules running you might have to up your APC cache as well, but Prestashop is fairly compact and I haven’t had to raise a shop over 128mb yet. If you are developing a shop and want a real true speed test, I would recommend using New Relic. They have a free tier which will give you a lot of information about how your site loads, without muddling things with network traffic.


Some notes on hosting

Not all hosts are created equal and not all VPS packages are created equal. Here is a short list of VPS providers that I would not recommend.

  • A2 Hosting – Their managed VPS accounts do not give you root access, you will need root access to do most of the things that I mentioned here. They do have un-managed hosting, but they do not offer CPanel on their un-managed accounts. You still can set most of these things up without CPanel but it takes more time and skill.
  • Hostgator – They also do not give you root access using their VPS accounts, so most of the things are not possible.
  • Ramnode – They do offer SSD drives and CPanel licenses with root access, but from my tests their accounts do not have the processing time allocated to them for a quick shop.
  • Godaddy – They do offer Cpanel access, but their MySql servers are not hosted locally. This is actually a major reason not to use them, their database latency times jump all over the place, you have no control over them.


Some notes on Prestashop settings

The more modules that you have installed the more resources that your shop will consume and the more processing power that your shop will need. I recommend disabling any module that you are not using and uninstalling the module. Also some other recommendations;

  • Disable your shop stats. Stats are nice, but using a properly configured Google Analytics account you can get most of the information that you need. Using the stats consume resources and make MySql calls to your database. I generally disable them.
  • I also recommend disabling the minifying html and compressing of Javascript in Prestashop. One, if you are using the mod_pagespeed you will not need this, two out of all of the settings these two add the most time to a being processed on the server.
  • Turn error reporting on before you launch your shop and correct any errors that are being reported. Errors in modules will slow the shop down.
  • Don’t use a htaccess file. Move the directives from your htaccess file to your httpd.conf file. Loading a htaccess file takes time, having the settings stored in the httpd.conf file will load them from the memory cache and will speed things up on the site.
  • Using the default specials and new products blocks will result in a lot of database requests, disable them if you can.


Notes on Google Page Speed, Yahoo Yslow, and GTmetrix

The tips that they give on these sites do not generally speed anything up server side. Think of a website in these terms. The server generates information and sends it to the user. In that transaction their is two places for bottlenecks. The first bottle neck is the server generating the site, the second bottleneck is the users computer decoding the information. Tools like Yslow and Google Page Speed only help speed up the user’s decoding of the files that are sent. They do absolutely nothing for the time it takes your server to process and compile your site. Most of the advice in this article is geared towards getting your site processing faster and delivering content to the user faster.

To illustrate the point, look at this graphic below, it only registers and 82 in the page optimizations, yet it is faster than 93% of loaded sites. http://tools.pingdom.com/fpt/#!/8mQQj/http://bijouthings.com

Fastest Prestashop


Prestashop Intro to SEO

$
0
0

Now that you have set up your shop, you need to have people start coming to your shop to buy things. But how are you going to get the word out? You basically have 3 options; you can do pay per click advertising, other types of paid ad placements, or organic SEO. Organic SEO is by far the best option to use, but it does not work overnight.


What is Organic SEO?

You might have heard people use the term organic SEO, but do you actually know what it means? Organic SEO is the term used to describe the ranking that search engines naturally give your site without using any kind of paid advertising. Searches have a tightly guarded metric that they use for detrimining a sites rank in the search engine results pages (this is also called the SERP’s). Google actually uses over 200 different metrics to determine a sites placement, Bing has around the same metrics (did you know that Yahoo’s search results are actually provided by Bing).


Where to start

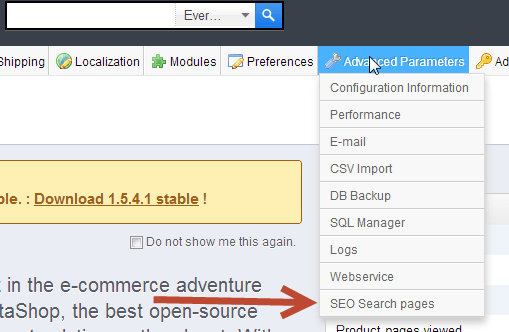
In this article I am going to assume that you have a basic knowledge of Prestashop. This article will rely solely on the features built into Prestashop without using any outside modules. I will try to explain everything as in-depth as possible so that you get a clear understanding of what you are doing and why you are doing it. Now let’s log into your back office and get started.


The first thing you want to do is turn on your friendly URL’s for your site.  In your back office go to Preferences >> SEO and URLS.  The page will look like the image below.

SEO URLS


Click the radio button next to “Friendly URL” and the one next to “Automatically redirect to the canonical URL”. Once you select those press save. If you notice in the image above there is a warning message on the “Friendly URL” this sometimes happens because of the way that your server is set up. If once you press save your site becomes inaccessible it means that mod_rewrite is not active on your server, you should contact your host and have them install or enable it, it is very important to the SEO of your website. To fix your site in the meantime, you will have to ftp into your site and delete the htaccess file. Then go back to the SEO and URL’s page and turn off “Friendly URLS” and the redirect to canonical url In this example the warning message goes off, but it is a false alarm and nothing to worry about, this sometimes happens.

Friendly URLS are very important for the SEO of your site below is a graphic from SEO Moz about the structure of URLS.

SEO URLS


Now let us look at an example from Prestashop and dissect it.

This is an standard dynamic URL that Prestashop uses before you turn friendly URLS on. This is for the test product “Belkin Ipod Case”

http://site.com/index.php?id_product=6&controller=product

This is the friendly URL version

http://site.com/accessories-ipod/6-belkin-leather-folio-for-ipod-nano-black-chocolate.html

By looking at the unfriendly URL, you or search engines have no idea what is on the actual page, but by looking at the friendly url you have a pretty good idea what you are going to be looking at. Search engine are like people in a lot of rights, they look at the URL to determine how relevant the page is to a search result.

One thing that the friendly url in the example is not doing is being concise. You want to use the shortest amount of words to describe the product. A better URL would be “http://site.com/accessories-ipod/6-belkin-leather-ipod-nano.html” The reason being is every word after the top level domain is given an equal weight. The less words, that are in a URL the more weight that they carry with the search engines.


Canonical URL’s and their place in SEO is tricky to understand. Search engines use a system that they call page rank. Google updates their main page rank database every 3 months or so and so does Bing. The higher page rank a page has, the more likely it will be show versus other pages in the SERP’s. Page rank is generally on a scale of 0-10 there is also a N/A rating, meaning the page has not been assigned a rank yet. Sites like Facebook and Twitter are 10’s because they are very popular and get a lot of traffic. The reason why I am explaining page rank, is because it can be split between the same page in a not so good manner. Take for instance the 4 urls below.

http://site.com

http://site.com/

http://www.site.com

http://www.site.com/

Usually all 4 of those URLs will take you to the same page. What the canonical redirect does is make sure that when you go to any of those 4 URLs, the address in the address bar is redirected to the correct address. This makes sure that your page authority is not split over those 4 URL’s, it makes all of the authority go to one URL, giving you a better ranking over time.


On to Meta information

Meta information, also called meta tags are little snippets of information that is not shown on the page, search engines use it to classify pages of a site and use it as one of their indicators to judge what the page is about. Meta information is separated into 3 parts.

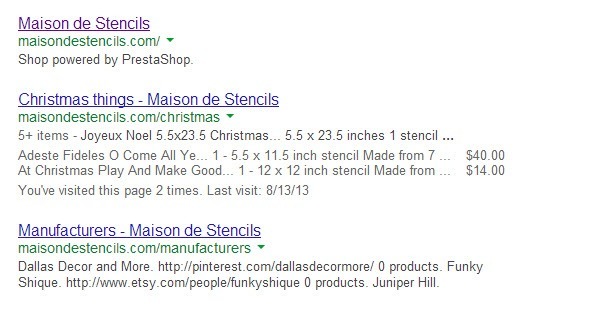
Title – This is the title of the page, this is the description shown in the top of the browser bar. Roughly you want your meta title to be about 70 characters and be a few words as possible. Every word in the title is given a weight, the more words, the less weight that each word carries. Also remember that Prestashop adds the shop name to the end of your title, so take that into account when you come up with your title as well. One other thing to keep in mind, most of the times title are the main snippets used to describe the page in the search engine. Like in the image below the pages title is “Apple – Ipod nano with Multi-Touch”. Be concise and to the point with these tags, they will be the first thing people will see coming from a search engine, you want to make them appealing so people will click them. You can also use either | or – to separate words or phrases in your titles.

SEO Search Results


Meta Description – The meta description is the description directly under the title in the SERP’s. You want to limit it to around 155 characters, or it will get truncated in search engines as well. The best thing you can do with this text is make it readable and as descriptive as possible, do not use it to just stuff keywords in, search engines are wise to that. Some things to keep in mind, use a different meta description for every page, the meta description does not actually factor into the ranking of the pages anymore, and write compelling copy.

Meta Keywords- The meta keywords tag is a touchy subject with a lot of people. Google has confirmed that they no longer using them in any way to rank a web page. Bing however has been very mysterious about how they use the meta keyword tag. So my suggestion is to only use about 2-3 words per page if you use them at all.

Friendly URL- The friendly URL is the URL that Prestashop will write after the site name or site name and category name if you are on a product page. Treat the friendly URL like the page title, I would actually suggest using the same thing as the page title, it makes the page more relevant for those search terms.

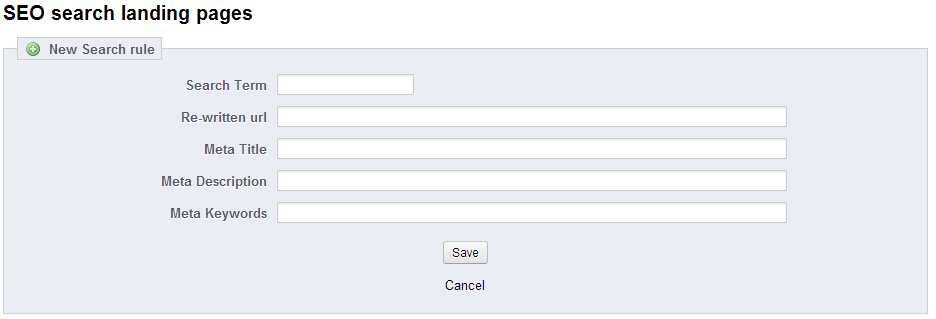
Now that you have a little information about each tag and what their purpose is, you can start adjusting them. When you go to Preferences >> SEO and URLS, the list at the top of the page is all of the default pages that Prestashop creates for the site to run smoothly. See the image below.

Prestashop SEO Pages


If you click the pencil and paper icon to the right of the page name you can set the meta tags for each page. I would suggest changing these since every Prestashop installation has the exact same text. Keep in mind that some of these pages are blocked from search engines indexing them; we will talk more about that later though. When you click the pencil and paper icon on the right, the page will look like the image below.

Prestashop Meta Tags


Once you change the information to what you want to use, press save at the top of the screen and move on to the next page.

CMS and Category Pages

The CMS pages are laid out the same way with the meta descriptions. To access your CMS pages go to Preferences >> Cms. Once you are their click on the pencil and paper icon like you did with the pages that Prestashop creates.

To edit the categories, it is the same process, go to Catalog >> Categories and click the pencil and paper icon to edit them as well. The categories have a couple of extra fields that the other pages do not have. You can write an on page description for the categories and you can also upload an image for the categories. Using these depends on your theme, how it is laid out, and if it looks good having them. I would suggest at least using the description to provide a little bit of information about the category.  See the image below.

Prestashop Category SEO

Product Page SEO Information

The product pages are laid out a little bit differently than the other pages. Inside the product page there is an SEO tab. It looks like the image below.

Prestashop Product SEO


In this tab you can enter the same information that you would in the other sections.


Apart from using the meta data on the product pages, I would suggest writing good descriptions. Having well written descriptions helps a site rank higher, especially if you are using a data feed. If you are using a data feed, everyone else in the world that is using the same feed is using the same descriptions, so what makes you think that your site is going to rank higher than theirs? Have clear to the point descriptions that reference what the page is about a few times is good. I would make the long description at least 500 characters if you can. Also I would use the features to list the different features of the product. This is helpful to the customer, especially if they are looking for a product with a specific feature. Great descriptions go a long way in giving customers confidence in a site and selling your products.

One other note, if your products have a unique number to identify them such as a bar code, UPC, or EAN 13, I would also fill those out. When people search for the lowest price on a specific product, they often times only search by that number.


That concludes this lesson.

In the next article I will show you how to set up your Google analytics account, your Google web master account, and your Bing account.


by  is an expert in Prestashop and SEO related to e-commerce sites. He is the owner of Nashville based Designhaus42, a leader in Prestashop development with clients all over the world. In his free time he is a global moderator on the Prestashop forums and is very active in the SEO moz forums.

Win a Free Website Optimization

$
0
0

If you do not already know, at dh42 we specialize in optimizing websites. We understand that having a fast website not only ranks higher in search engines, but it also increases sales and reduces the bounce rate. We are proud to offer our Basic Level Website Optimization Service to one lucky winner. Our basic service is great for any site, it will work on any server. Included in our basic optimization is combining and compressing files, reducing http requests, compressing images, making css sprites if possible, htaccess optimizations, and several other tricks we have learned over the years. These are the optimizations that directly affect the Google Page Speed and Yslow metrics.  Please note this giveaway is limited to only Prestashop and WordPress sites only. 


a Rafflecopter giveaway


Setting up MAXCDN with Prestashop

$
0
0

I think most of you that read my blog regularly know that I usually do not refer CDN’s because of the slow DNS lookup time and the murky stats on if cached resources were actually being served. Recently I had a client that requested MAXCDN set up on their site though. After setting it up, I have come to the conclusion that it is amazingly easy to set up and if you are wanting a CDN service I would recommend them. As a note, in Prestashop CDN’s are referred to as Media Servers.


Getting Started

Once you set up your MAXCDN account, go to your account summary and click on create a pull zone.

maxcdn_create_pull_zone

I chose not to use a custom CDN domain with this site. The reason being is that the site uses SSL and it does not matter if the site uses a custom CDN url or the default url. When you click create, the zone should be created. As a note, if you have a wildcard SSL certificate, you can use the custom CDN domain, you would also need the custom edge SSL service as well.

maxcdn_created

Now the Pull zone is created, yay. Now we need to go to the summary page, below you can see the information that is entered. Copy the CDN url, you will need it later for adding the Media Server to Prestashop.


maxcdn_zone

Now you need to go to Pull Zones and manage the pull zone that you just created. Below are the settings that I recommend using.

MAXCDN Settings


If you are using SSL on your website

If you are using SSL on your website you will need to click on the EdgeSSL tab. This will make your CDN requests serve over HTTPS so that the security of your site does not break. Once you are in there, click the enable and copy the url that it gives you.

MAXCDN SSL


Setting up the Media Server in Prestashop

This is the easiest part of the whole set up. From your Prestashop back office, go to Advanced Parameters and Performance. When in there, go to the bottom and in Media Servers enter the CDN address you copied earlier.

Prestashop Media Servers


Now you are done and your site can serve your media files from MAXCDN’s servers all around the world. Good luck and happy selling!

by  is an expert in Prestashop and SEO related to e-commerce sites. He is the owner of Nashville based Designhaus42, a leader in Prestashop development with clients all over the world. In his free time he is a global moderator on the Prestashop forums and is very active in the SEO moz forums.


Website Optimization

$
0
0

This article is a little different from the others I write. I find myself talking to people about website optimization a lot, so I think it is about time to put all of the information in one place and go through it bit by bit.


Two types of Optimization

With a website there are two different places that speed can bottleneck and fixing them is a very different process. The first thing you have to do is locate the bottleneck on the website; once you have it located you can start fixing the issue.


Server Optimization

Server optimization is one of the best things you can do to speed up your site, but at the same time it can be one of the most limiting  area’s as well. Look at the two images below, the first image is a site that is running on an optimal server configuration. Notice how it takes that server around .22 seconds to compile the page and send it out. The second image though is a site that is run on a non-optimal configuration. This server takes almost 2 seconds before the file is compiled and the first information is sent to the client.

Fast ServerSlow Server

The main cause of a server taking too long to compile a file and send information to the user is using overloaded shared hosting. Usually in the cases of using shared hosting you cannot do any server optimization. You really only have two choices in this situation. You can move to a VPS account or you can try another shared host to see if their servers are less overloaded.

If you already have a dedicated server or a VPS account then the server issue can more than likely be fixed. There are a couple of different things that can be done to speed a site on a server like this up. The first thing I usually do in this situation is look at the site as a whole and try to diagnose why the site is taking so long to download. In Prestashop you can turn on a debugging profiler to see exactly why a site is taking so long to process.  Wordpress and Prestashop have a lot in common when it comes to why sites are taking a long time to process in most cases. It usually comes down to using third party modules that are not written very well.


Common Fixes for Slow Servers

  • Install an Opcode cache such as APC or Optimizer.  Doing this is one of your best bets for speeding your site up.  On a basic level this is how your site operates. A user makes a request for a page, your web server finds the page on disk and loads it to memory, then it compiles the page to Opcode, preforms the operations, then serves it to the user. Using APC or Optimizer the page is stored in the Opcode state in memory. This cuts out the processing required to retrieve the page from disk, the wait on the disk, and the processing time of converting the page to Opcode. Using an Opcode cache you can reduce the time your server takes to compile and send a file by about half. Depending on your modules and site, I normally recommend about 32mb for WordPress and 64mb for Prestashop.
  • Disabling modules or plugins that are causing the slowness. Sometimes if they are essential to the operation of the site they can be rewritten, but in most cases it is not economical to have them rewritten.
  • Install a caching program on the site. WordPress has a good caching plugin called W3 Total Cache and Prestashop has several cache managers that can speed up sites.
  • Disable any unused modules or plugins. With some modules or plugins just because you are not using them does not mean that they are not taking up resources. A good rule of thumb is to disable them if they are not being used.
  • Use an off server CDN. Using an off server CDN actually serves a couple purposes. First they take load off of your server from having to server the static files, next they usually serve the files from a closer geographical location. One thing CDN’s such as MaxCDN do is strip cookies as well, this decreases loading time of the resources as well.


Site Optimization

The other major type of optimization is site optimization. If your server is processing and outputting files in a reasonable amount of time, but your site is still slow your site more than likely needs to be optimized. Optimizing your site has many benefits actually; people will be more likely to browse longer on your site. Studies have shown people tend to abandon slow websites.  At the same time Amazon has a pretty indepth study showing that having a faster e-commerce site results in more sales. Another bonus to having a faster site is that Google and other search engines will rank you higher in the search results too. So you basically have a win / win situation.

Optimization Testing

There are several free tools on the market that you can use to see if your site needs to be optimized. They can diagnose your site and tell you what area’s you need to fix. Here is a short list of the most popular ones that I use, pingdom.com, GTMetrix, Google Page Speed, and Yslow.

In optimizing sites for download and display there are 3 things I have noticed are reoccurring issues on sites.

  • Too many requests. The amount of files your site is made up from should be limited. Most sites use multiple CSS files and multiple JS files. This should be avoided as much as possible. See a modern browser can only download so many files at once, so you should try to optimize the download channels usage.
  • Images that are not optimized. With CMS’s I have noticed people upload images without any thought to what size they are or if they are compressed. I recently optimized a site that was 5mb for the first page. It had a slider with 4 images in it, with each being over 1mb. After I optimized the site, the whole front page was about 1.2mb.
  • Incorrectly configured htaccess files. The htaccess file provides several methods for speeding up your site. Two of the main forms are enabling Gzip compression and enabling cache control for the website.

When optimizing your site for download, one thing you have to beware of is 3rd party scripts. One that I have noticed that is particularly bad is Turn Social. It loads over 100 requests itself. In optimizing a site you also have to know when to cut your losses by not fixing an issue. Some resources that are commonly used have poor caching and are not optimized. Two major examples are Google Fonts and Google Analytics. Google Page Speed points both of these resources out as being an issue.

If you need your website optimized or have any questions regarding website optimization, you can contact us here.


by  is an expert in Prestashop and SEO related to e-commerce sites. He is the owner of Nashville based Designhaus42, a leader in Prestashop development with clients all over the world. In his free time he is a global moderator on the Prestashop forums and is very active in the SEO moz forums.

Free Prestashop NMI Module

$
0
0

Here is a free Network Merchants module that works with Prestashop versions 1.4x and, 1.5x, and 1.6 alpha. The module is based off of the Prestashop Authorize.net module which is in-use in thousands of stores world wide.


Screenshots of Prestashop NMI Payment Module

Prestashop NMI Payment

Prestashop NMI Payment Module

Download NMI Payment Module

Fix Prestashop Free Shipping

$
0
0

I have seen many people ask about how not to display the free shipping method on the front end of Prestashop. This is an issue only if you use a carrier that gets live rates, such as UPS, USPS, Fedex, or another carrier type like this. The main reason that this happens is that Prestashop is checking its internal shipping methods and they are not returning a value, so free shipping is displayed.


Free Shipping Fix

I have come up with a little work around for not displaying “Free Shipping” when you are using a live carrier. The code to fix the issue is below, and a link to the Gist is here. What the does does is checks to see if the user is logged in and then it also checks to see if a carrier is selected. If it fails those conditions then a different message is displayed. The message is configured on line 39.


To use this change

To use this change all you have to do is replace the contents of your blockcart.tpl file with the contents below. One thing to keep in mind is that the blockcart.tpl below might not be compatible with custom themes. If it is not compatible with your theme, you might try copying lines 38-42 and 143-148 into your theme. Good luck.

by  is an expert in Prestashop and SEO related to e-commerce sites. He is the owner of Nashville based Designhaus42, a leader in Prestashop development with clients all over the world. In his free time he is a global moderator on the Prestashop forums and is very active in the SEO moz forums.

Prestashop Image Optimization

$
0
0

Earlier this week I was talking to a client and they mentioned to me that their Google Page speed score was low, so we investigated the issue together and it seemed their issue was the images on their site. The images were just too large and not optimized correctly. I explained to him that Yahoo has a tool called Smushit that he can use it to optimize the images before he uploads them to the site, but at the same time I realized this is not an option for the product images since Prestashop creates its own images that are not optimized.


A couple of days later he emailed me and showed me this module he had found. It claimed to use Smushit to optimize the images that Prestashop generates. For years I have thought this would be an awesome module to have, but I did not realize that anyone had actually made this module already. I talked to the guys at PresTeamShop and they sent me a copy of the module to try out. Honestly with as much optimization as I do on sites, I was skeptical on how well the module would work. Most stores have tons of images; I could not imagine how it could send them all over to Smushit and get everything back correctly without having errors or connection issues. But this module did everything it promised and reduced the page size of my client’s site drastically. I forgot to take a before and after image of the home page, but the reduction was almost 2mb and all of the images have the same quality as before.


Installing and Setting it up

Installing and setting up the module was very straight forward, I did not have to manually edit any files and there was nothing out of the ordinary in the set up process. Below are a couple screen shots of the module. One great feature about the module that is not apparent from the configuring and set up of the module is that once it is installed, all of your new product images will automatically be optimized. So you do not have to keep regenerating images each time you add a new product. This makes the module a great time saver.

Smushit Module

This screenshot might look familiar, the way the module optimizes the images is very similar to how Prestashop regenerates the images in the back office.

Smushit Interface

This is what the module looks like when it is regenerating images. You can see the size savings for the images as they are being regenerated.

Smushit module running

The Results

Below are the two Google Page Speed tests ran on the website, the top one is before the module was installed and the images were regenerated. The bottom one is after the module was installed and ran. You can see a 33 point gain in page speed just by running the module.  Also you can see there are no notices anymore about optimizing images. Also, not only does the module optimize the product images that Prestashop has, it also optimizes the theme images as well. So it can totally eliminate all of the image warnings for your whole site.

Page Speed Before


After

Page Speed After

The Bottom Line

The bottoms line is I would recommend this module. It will make your shop faster, it will reduce your bandwidth costs, and it will improve your SEO since page speed is now a ranking factor. the module will also save you time by automatically using Smushit on new products you add to the shop. One other thing I would like to note, this module was tested on a website that is hosted on Hostgator shared servers. The reason I am mentioning this is because a lot of modules that contact other servers such as this module might not work on shared servers, but this one preformed excellently without any modifications.

Also, as a special offer from PresTeamShop, they gave me a coupon code to that will take 20% off of the module that is good through December 31st, 2013. The coupon code is DH42-SMUSH  Get this module and make your shop faster the easy way. Get the module here!


by  is an expert in Prestashop and SEO related to e-commerce sites. He is the owner of Nashville based Designhaus42, a leader in Prestashop development with clients all over the world. In his free time he is a global moderator on the Prestashop forums and is very active in the SEO moz forums.

Prestashop Media Server Hack

$
0
0

Using media servers with Prestashop is a great idea to speed up your site, but if you do not have a wildcard SSL certificate you cannot really run them. Sure you can use services such as MaxCDN or similar, but if you are on a tight budget it might not be feasible. Let me show you how you can get all of the benefits of media servers, without having to use an external service or having a wildcard SSL certificate.


The Code

The code below works with Prestashop 1.5, all you have to do is create a file named Tools.php in the overrides/classes directory and paste the code below into it. Then you add your media servers like normal. You will have to flush the Prestashop cache to enable the changes.


If the file is already created, it might just be blank depending on the version of Prestashop you are using. If it has content in it, it could have an override already added to the file. If that is the case you will have to hand merge the override.

by  is an expert in Prestashop and SEO related to e-commerce sites. He is the owner of Nashville based Designhaus42, a leader in Prestashop development with clients all over the world. In his free time he is a global moderator on the Prestashop forums and is very active in the SEO moz forums.

Free Prestashop Optimizely Module

$
0
0

If you are not familiar with Optimizely you are missing out on sales. Optimizely is a multivariate testing tool that will allow you to fine tune your website to produce more results. The best part about using Optimizely is that you do not have to know how to code to use it effectively. All you have to do it use their intuitive editor to make changes and see how they will affect your sales.


Multivariate Testing

What is this madness you might ask? It is really simple, have you ever wondered if having your buy now button a different color would have an effect on your sales? It very well could. Or if you used different text, how it might affect your sales. This is what Optimizely lets you do. You can make changes to your site and test them against the current layout to see which one works better. Take a look at the images below.

Original Site


Optimized Optimizely


You can see the two different versions of the products page of a Prestashop website, but which one will preform better? That is where Optimizely comes in. You can set up tests of different pages like this and track which one leads to more purchases. If you do not have an Optimizely account, you can sign up for one at optimizely.com. 


The Module

The module is very straight forward, once you download it and install it, you need to enter your tracking code in it. Then you can go to your Optimizely account and start making variations for testing and deploy them. It is that simple. Below are a few screenshots of the module.

Optimizely Install


Optimizely Configure


Download the Optimizely Module for Prestashop


by  is an expert in Prestashop and SEO related to e-commerce sites. He is the owner of Nashville based Designhaus42, a leader in Prestashop development with clients all over the world. In his free time he is a global moderator on the Prestashop forums and is very active in the SEO moz forums.

Free Prestashop ClickTale Module

$
0
0

Are you using heat mapping to track visitors on your website yet? If you answered “no”, you are missing out on sales and lost opportunities. Heat mapping software is an excellent way to optimize the conversion rate of your website. Imagine being able to see what people are actually clicking on and looking at on a page. By doing this you can see which elements on your site are generating interest and which ones should be replace with other elements. The best thing about it all is that the module is free and ClickTale has a free forever plan!


What does heat mapping mean?

With ClickTale the analytics are deeper than heat mapping, they offer several different analytics to help you optimize your website. In the image below you can see where the actual on page clicks are happening on the site. The little white marks represent mouse clicks. One thing you can tell from this metric is that people are clicking in the quick view for product information. The quick view button is in the center of the product images, that is where people are clicking. I can also see what menu items people are clicking on as well.

Clicktale Mouse Clicks


In the next image below I can see exactly where people are with their mouse on the page, what they are mousing over and what they are not. This way I can figure out which elements of the page appeal to people and which ones do not.

ClickTale Heatmap


This image below is one that I have found very important in website conversions. In the newspaper industry they refer to content that you can see on the folded newspaper as content that is above the fold. This is where newspapers have always put their most important headlines and pictures. The same theory works for websites as well. This image shows where my content is on screen for my average viewer.

ClickTale Fold


The analytics that ClickTale provides are so deep and thorough that anyone can increase the engagement and their sales by using it. Once you start looking at them, you will be hooked optimizing your website and finding content that works and increases conversions.


The Module

The module is very simple to set up and use. Once you download it and install it, you will need to enter the two tracking codes into the module, click save and you will be all set. This module is compatible with all versions of Prestashop 1.5 and 1.6.

ClickTale Module


ClickTale Module Prestashop

Download the ClickTale Module for Prestashop


by  is an expert in Prestashop and SEO related to e-commerce sites. He is the owner of Nashville based Designhaus42, a leader in Prestashop development with clients all over the world. In his free time he is a global moderator on the Prestashop forums and is very active in the SEO moz forums.

Free Prestashop Pinterest Verification Module

$
0
0

If you are not using Pinterest yet to promote your products, you are already behind your competition, because they are. When you have awesome products Pinterest is a great way to show them off to the world. But if you have a Prestashop website, it might be hard to get your website verified by Pinterest without getting a developer involved. That is why we made a Pinterest verification module to take all of the work out of getting verified.


How to get verified

When you log into your Pinterest account you will need to click on your name and and a drop down will appear. Click on “Your Profile and Pins”.

Pinterest Account


Now click on the pencil and paper icon in the lower right hand corner of your profile and you can edit it. Next you will want to click on “Verify your Site” and a box like below will pop up.

Pinterest Verify


In this box click the red text that says “Verify with a meta tag” when you do the box will change into the box below.

Pinterest Verify Meta Tag


Now you will want to go into the backoffice of Prestashop and go into the Pinterest verification Module. Click configure and the inside of the module will look like below. Paste your verification meta tag into the module and click save. Now you can go back to Pinterest’s website and click “Complete Verification”.

Pinterest verification Prestashop


That is all you have to do and your site should now be verified with your Pinterest account. Now you can get to making fun and creative pins and driving traffic to your site.


The Module

The module is simple to setup and use, it is also compatible with all versions of Prestashop 1.5 and 1.6.

Pinterest Prestashop Module


Download the Pinterest Verification Module for Prestashop


by  is an expert in Prestashop and SEO related to e-commerce sites. He is the owner of Nashville based Designhaus42, a leader in Prestashop development with clients all over the world. In his free time he is a global moderator on the Prestashop forums and is very active in the SEO moz forums.

Free Prestashop Add This Module

$
0
0

Social media powers most businesses if you are not harnessing it, you are behind your competition. Add This is one of the largest and best services for putting your customers closer to your social media reach. With our new module you can not only display the social sharing buttons on the product pages, you can take advantage of their Welcome Bar and Smart Layers also. The module is configurable to let you chose what type of pages you want the Add This widgets on as well.


The module

This module functions very simply, first you need to install the module. After you install the module you need to go to Add This’s website and configure the sharing services the way that you want them configured. Once they are configured you will get a code to paste into the module. That is it, you will start noticing more sharing and interactions from your customers.

Below are a couple of images of the module.

Prestashop AddThis


Prestashop AddThis configuration


Download the Free Prestashop Add This Module


by  is an expert in Prestashop and SEO related to e-commerce sites. He is the owner of Nashville based Designhaus42, a leader in Prestashop development with clients all over the world. In his free time he is a global moderator on the Prestashop forums and is very active in the SEO moz forums.

Free Prestashop CSS Module

$
0
0

There is no easy way to make small changes to the CSS of your Prestashop site. You can use a FTP client and navigate to the proper file, if you can figure out which file it is in. If you do that though, the changes will be erases when you update your shop or your theme. This module takes care of that problem. You can edit the CSS and the changes will not be erased when you upgrade your theme or your shop or even if you change themes.


The Module

The module is on a basic level an area where you can enter custom CSS. If you do not know CSS, it is relatively simple to learn and can help you set your Prestashop website apart from every other shop online. With this module you can adjust background colors, font-sizes, fonts, just about any thing visually on your Prestashop store can be accomplished with CSS.

Prestashop CSS Module

Prestashop Module CSS


Download the Prestashop CSS Module

 Compatible with Prestashop 1.5 and 1.6

by  is an expert in Prestashop and SEO related to e-commerce sites. He is the owner of Nashville based Designhaus42, a leader in Prestashop development with clients all over the world. In his free time he is a global moderator on the Prestashop forums and is very active in the SEO moz forums.


Free Prestashop Twitter Card Module

$
0
0

Twitter is a great way to let your followers learn about your new products, but how can you make your tweets stand out from everyone else’s? Twitter Cards are the answer. Twitter Cards let you tweet so much more information about your products and site than just a simple url. You can tweet whole cards that show, your site name, images of products, and even the prices. Now Prestashop has a free module that supports twitter cards, you should download it and get to tweeting today!


The Module

The module displays the product price, image, your twitter account, and two lines of custom text on the products page. On the home page you can configure your sites title and description. Using this module will make your tweets stand out from your competitions and you will get more retweets and purchases.

Prestashop Twitter Card


Twitter Card Module


Download the Free Prestashop Twitter Card Module

 Compatible with Prestashop 1.5 and 1.6

by  is an expert in Prestashop and SEO related to e-commerce sites. He is the owner of Nashville based Designhaus42, a leader in Prestashop development with clients all over the world. In his free time he is a global moderator on the Prestashop forums and is very active in the SEO moz forums.
Viewing all 83 articles
Browse latest View live